Quick Start
This quick start will guide you to step by step, from install and run a local instance to deploy and test your first Turkserver app in real world.
Example project: Tutorial. For more information, regarding how to build this app, see here.
Background
TurkServer is a framework based on the JavaScript app platform Meteor that makes it easy to build interactive web-based user experiments for deployment on Amazon Mechanical Turk.
This tutorial will explain how to get up and running with TurkServer. The intended audience is someone who:
- Is familiar with Amazon Mechanical Turk and understands how to request and approve work. If you have never used Mechanical Turk before, we recommend you explore a bit first. Go here and create one of the example projects. xs
- Knows the basics of the JavaScript app platform Meteor. If you have never used Meteor before, that’s fine – it’s quite easy to learn. Before continuing with this tutorial, install Meteor and then complete the to-do app tutorial.
TurkServer is designed around the Meteor framework. There are many reasons that Meteor is especially powerful for web development; see this post for a summary. But more importantly, there are tons of learning resources for new users to get started. The design philosophy of TurkServer is to stick to standard Meteor as much as possible, while minimizing the need to use custom APIs. This means that most of the outstanding Meteor documentation on the Internet will be useful, and that most of the required knowledge is not specific to TurkServer.
All the code for the project that you will build during the tutorial can be found here. If you have questions, comments, or suggestions, please add a Github issue to that repo.
The Basics
Before getting started, it will help to define some terminology used by TurkServer. Many of these concepts are from Mechanical Turk, and should therefore be familiar to you, but others will be new.
- Worker: A Mechanical Turk user.
- HIT: A task that workers can complete on Mechanical Turk. A HIT can be completed by multiple workers, but each worker can only complete a particular HIT once.
- External Question: A HIT with an external question is hosted on your own website and displayed in an iframe in the Worker’s web browser. TurkServer facilitates the process of building external HITs.
- HIT Type: A way to define the properties of a HIT, such as its title, description, and monetary reward. Each HIT has exactly one HIT type, but you can create multiple HITs with the same HIT type (e.g. you might post a HIT on Monday and receive some data, and then post another HIT of the same HIT type on Tuesday to receive additional data).
- Batch: Whereas a HIT Type is Mechanical Turk’s way of grouping HITs together, a batch is TurkServer’s way of grouping HITs together. The HIT Type determines Mechanical Turk properties of a HIT; the batch defines TurkServer properties of a HIT. When you create a HIT type in TurkServer, you must choose a batch for it. All HITs with that HIT type then belong to that batch and have the corresponding properties.
- Assignment: When a worker accepts a HIT, an assignment is created. The assignment keeps track of the work that the worker does on this HIT. You can approve or reject the worker’s assignment after he submits the HIT.
In using TurkServer, every Assignment of a HIT will go through one of three states (not necessarily in a linear fashion):
- Lobby – Where a worker goes right after accepting the HIT, and also between participating in experiment instances.
- Experiment Instance – Where the worker actually completes the task. Experiments are a logical way of setting up interaction between a group of workers and can consist of any number of workers, including just one.
- Exit Survey – Where the worker submits the HIT.
Each participant can be assigned to one instance at a time, but can participate in multiple instances over the course of a HIT, so that each instance can have one or more simultaneous participants. This supports various synchronous and longitudinal experiment designs.
The developer using TurkServer is responsible for building the user interface for each of these stages. In other words, TurkServer assumes you already have a Meteor app that controls the experience workers have after accepting your HIT and before submitting it. TurkServer is just the middleman between your app and Mechanical Turk. The framework will take care of connecting workers to your app when they accept the HIT, and submitting their work to Mechanical Turk when they are done with your HIT. TurkServer also allows you to easily monitor your experiment while in progress. But you first need to build the app that allows workers to complete the desired task.
Haven’t build the app yet? Don’t worry, we will get you started with one of our basic example projects - Tutorial.
So let’s start the journey now! (Click the “Next” button on the right)
Install
Git
Git is a free and open source distributed version control system designed to handle everything from small to very large projects with speed and efficiency.
How to install? See here.
Using GitHub as the install source is temporary until the Turkserver package reaches “beta”.
Meteor
TurkServer is built on top of Meteor.
Meteor.js is a cohesive development platform, a collection of libraries and packages that are bound together in a tidy way to make web development easier.
Meteor supports OS X, Windows, and Linux, and is simple to install.
 | OS      | Version             | Status |
 |---------|---------------------|--------|
 | Windows | 10                  |    ✔   |
 | Windows | 8.1                 |    ✔   |
 | Windows | 7                   |    ✔   |
 | Windows | Server 2012         |    ✔   |
 | Windows | Server 2008         |    ✔   |
 |  Linux  | X86                 |    ✔   |
 |  Linux  | x86_64              |    ✔   |
 |   OSX   | 10.7(Lion) and above|    ✔   |
On Windows?
Download the official Meteor installer
On OS X or Linux?
curl https://install.meteor.com/ | sh
Getting Started
Checkout the project
git clone https://github.com/TurkServer/tutorial.gitCreate settings file
cd tutorialUnder the root of your project, create a
settings.jsonfile, followsettings-template.json.Fill in “adminPassword”, “accessKeyId”, and “secretAccessKey”.
(Note: To retrieve your Amazon Mechanical Turk
accessKeyIdandsecretAccessKey, you need sign up AWS Account, see here )The file should look like this:
{
  "turkserver": {
    "adminPassword": <String>, // Password you choose for the TurkServer admin deshboard
    "experiment": {
      "limit": {
        "batch": <Number> // Max number of times a user can accept HITs in one batch
      }
    },
    "mturk": {
      "sandbox": <Boolean>, // Flag to turn on and off for Amazon Mechanical Turk Sandbox test
      "accessKeyId": <String>, // Amazon Mechanical Turk account accessKeyId
      "secretAccessKey": <String>, // Amazon Mechanical Turk account secretAccessKey
      "externalUrl": <String>, // Root url of your app
      "frameHeight": <Number> // Height of the iframe in M-Turk
    }
  }
}
Run your app
meteor --settings settings.jsonIn your console, you should see:
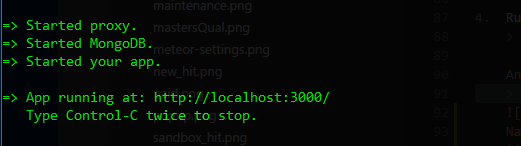
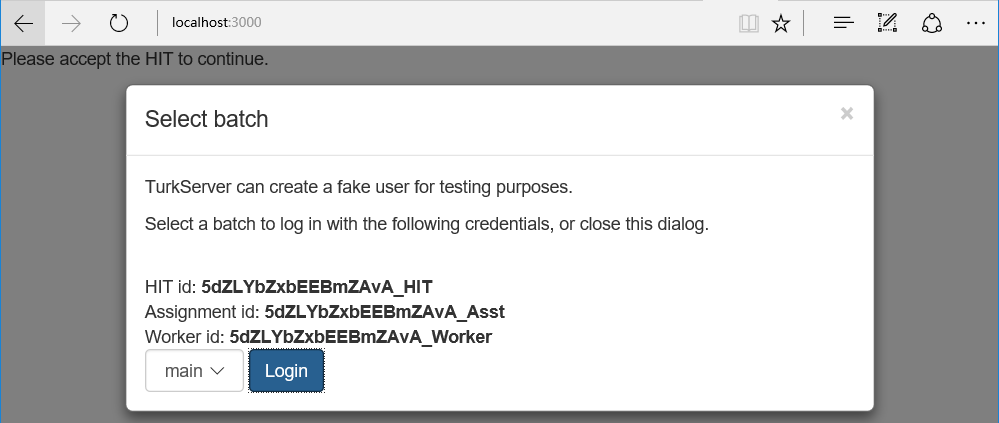
Open your browser, you should see:
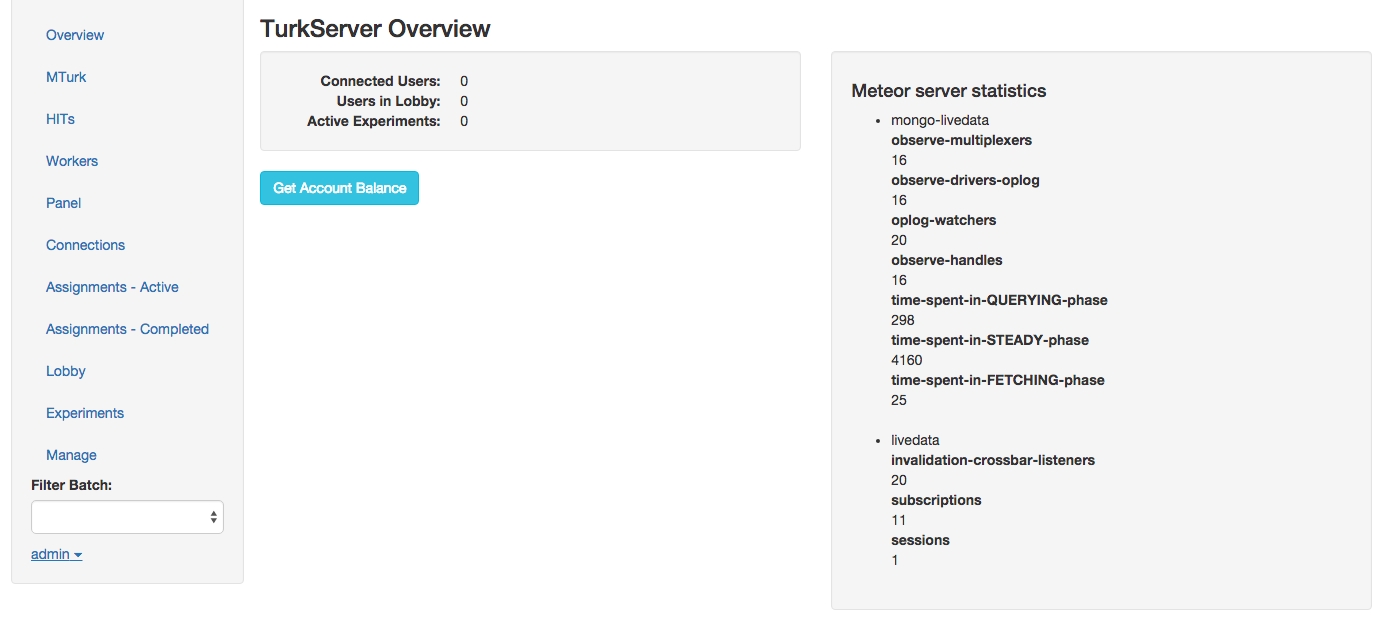
 Navigate to via http://localhost:3000/turkserver, login with your password, enter the admin dashboard:
Deployment
To deploy your meteor app in cloud, there are many choices.
Here we are going to use Microsoft Azure as example to show you how easily you can deploy your app in a cloud.(*Free one-month trial: sign up for free and get $200 to spend on all Azure services)
Understand Azure
Azure offers several ways to host web apps:
App Service (Very beginner-friendly, less manual)
Cloud Services (Beginner-friendly, and flexible)
Virtual Machines (Less beginner-friendly, but much more flexible).
Service Fabri (Less beginner-friendly, microservice-based application development)
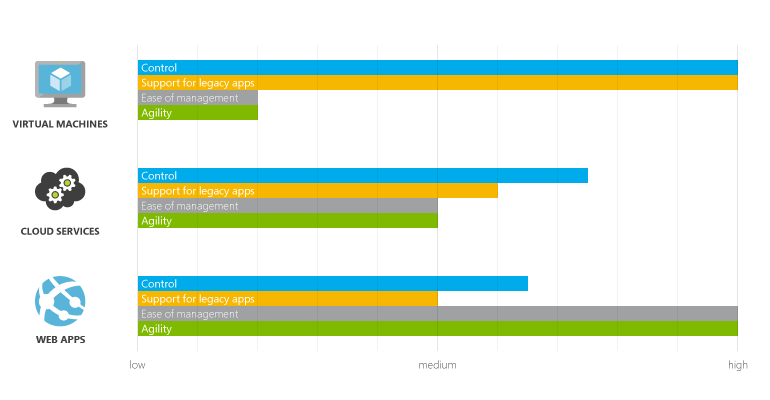
For more detailed comparison, see here.
Deploy to Azure App Service
Build App Service using Azure Portal
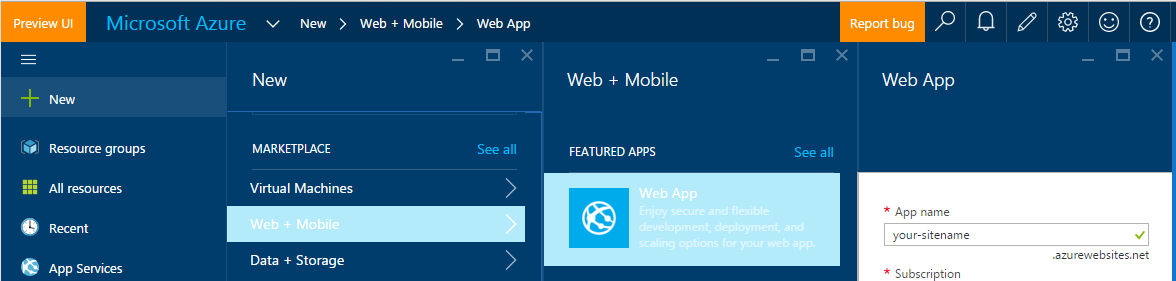 Or try it here.
(Note: Please don’t forget to set your
Or try it here.
(Note: Please don’t forget to set your deployment credentials.)Configure App Service
Add the following enironment variables in your Application Settings:
- WEBSITE _ NODE _ DEFAULT _ VERSION :
0.10.40 - ROOT _ URL :
http://{sitename}.azurewebsites.netor your custom domain if you’ve set that up - MONGO _ URL : (Mongo DB connection string from a MongoDB hosted on MongoLab or a VM)
- METEOR _ SETTINGS : JSON value equals to the entire contents of your
settings.jsonfile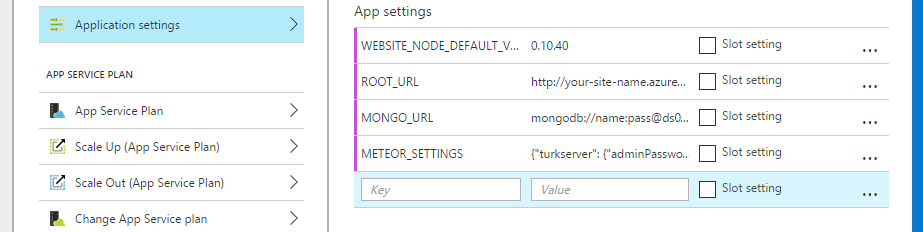
- WEBSITE _ NODE _ DEFAULT _ VERSION :
Deploy
Azure has native support for Node.js app, Azure App Service hasn’t enable native support for Meteor, you can track insider here.
However, we can still deploy to Azure App Service by demeteorizer - Which is a great tool to convert a Meteor app into a “standard” Node.js application.
In this way, you can take advantage of the native support with features like
high availability with auto-patching,built-in autoscaleandload balancing.For Windows users, we recommend to use Azure-demeteorizer. Make sure you install and meet all the prerequisites first, (Note: Visual Studio 2013 would be the most comaptible choice for most users.) then Azure-demeteorizer can do all the magic for you:
npm install -g christopheranderson/azure-demeteorizerto install azure-demeteorizer globally via npm:- `cd tutorial
azure-demeteorizer buildazure-demeteorizer installazure-demeteorizer zipazure-demeteorizer deploy -s [sitename] -u [username] - p [password]- sitename: the name of your App. - username: username for your site’s [deployment credentials]. - password: password for your site’s [deployment credentials].
(Note: For a full respect of your changes in Continuous Deployment, you need stop server during step 6.)
For all Linux/Mac OSX/Windows users, you can use Demeteorizer, however, you have to demeteorize first, and meet the meteor install requirements (Use Below command to install meteor on local environment: “curl https://install.meteor.com/ | sh” Then, Check for your meteor version. we highly recommend using > 1.4), then you can do a continuous deployment with Git, TFS, GitHub, or Visual Studio Team Services (Here use Git as example):
$ npm install -g demeteorizerto install Demeteorizer globally via npm$ cd tutorial$ demeteorizer$ cd .demeteorized/bundle/programs/server$ npm install(Please note: Use npm > 3 if you are getting any long path issues.. Use nvm to easily change node/npm version in local environment.)$ MONGO_URL=mongodb://localhost:27017/test PORT=3000 ROOT_URL=http://localhost:3000 npm startIf this is successful, then you can continue the step usinggit remoteto push your app to Azure. (If you didn’t choose continuous deployment using Git when you build your Azure App Service, you can manually set it up here). Don’t forget to add below app setting to your web app inside Azure portal App Settings Key: ROOT_URL Value: web app url(ex: http://{appname}.azurewebsites.net/) Then, create a web.config file under .demeteorized/bundle/ and insert this link content. Now you can navigate to .demeteorized/bundle/ folder and Commit your changes:$ git init$ git remote add azure https://username@{sitename}.scm.azurewebsites.net:443/{appname}.git$ git add .$ git commit -am "Initial Commit"$ git push azure master
Deploy to Azure Virtual Machine
Build VM by Azure Portal
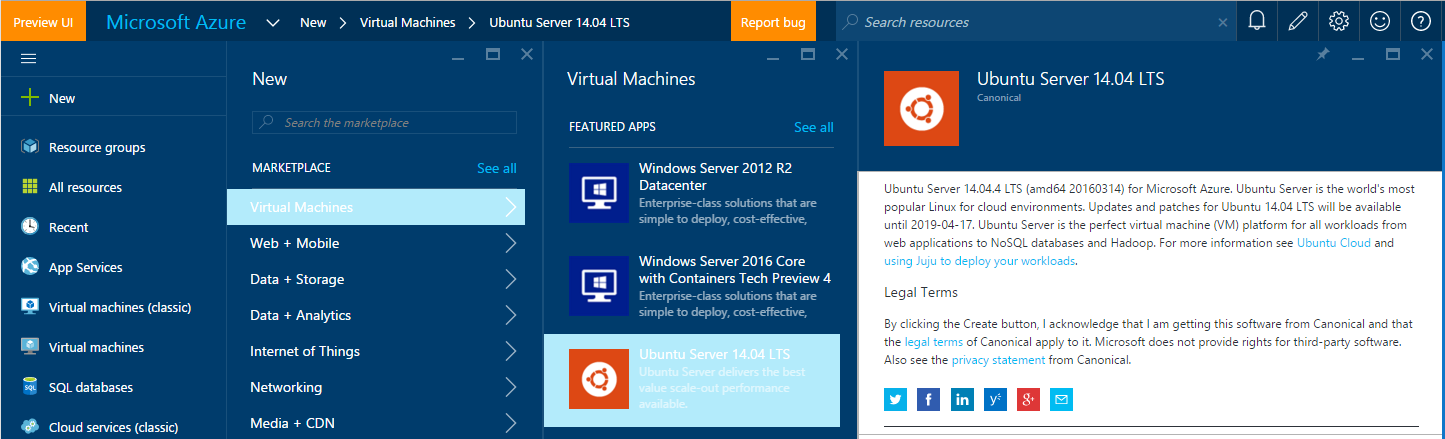 Or try it here.
(Note: Please don’t forget to set your deployment credentials.)
Or try it here.
(Note: Please don’t forget to set your deployment credentials.)Deploy
If you build Windows VMs, (i.e. Windows Server 2012) please check previous chapter “Deploy to Azure App Service” about how to demetoerize and deploy your app to Azure.
If you build Linux VMs, (i.e. Ubuntu 14.04 LTS) you can use Mupx, please continue the following steps:
npm install -g mupxto install mupx globally via npmcd tutorialmupx initto generate or manually add:* mup.json - Meteor Up configuration file, see exmpale here * settings.json - Settings for Meteor’s settings APImupx setupmupx deploy
Deployment Choices
| Client OS | Server OS             | Solutions(Recommended) | Status |
|-----------|-----------------------|------------------------|--------|
| Windows   | Windows               | Azure-demeteorizer     |    ✔   |
| Windows   | Linux                 | Mupx                   |    ✔   |
| Linux     | Windows               | Demeteorizer           |    ✔   |
| Linux     | Linux                 | Mupx                   |    ✔   |
***Note**: For other deployments on Modulus, DigitalOcean, Galaxy, please check the official deployment book here.
Test
This step is showing you how to do your sandbox test in Amazon Mechanical Turk,
according to Amazon payment requirements:
ExternalURL - The URL of your web app, to be displayed in a frame in the Worker’s web browser. This URL must use the HTTPS protocol.
It might take some time for you to setup your own SSL server if you are not using Azure, however, we strongly recommand you complete the test before actually make your project go live.
Enable SSL
- If you have deployed your app to Azure App Service:(Recommend for beginners)
- By default, Azure already enables HTTPS for your app with a wildcard certificate for the *.azurewebsites.net domain. If you don’t plan to configure a custom domain, then you can benefit from the default HTTPS certificate. Read more here
- For a better performance and connectivity, you can turn on websockets instead of long-polling in your App Service, simply by one-click in
Application settingsthrough Azure portal.
- If you have deployed your app to VMs using Mupx:
- You can add SSL support following here, however, you have to obtain your own SSL certificate from a certificate authority (CA) and a private key first.
- For other deployments, you might set up your SSL manually.
Sandbox Test
If you have deployed the tutorial app and enabled SSL successfully in a public server.
Then you can follow this step to do a sanbox test in Amazon Mechanical Turk.
Create HIT Type
Click on “MTurk” in the navigation pane. Create a new HIT type in the “New HIT Type” form:
 Note: Don’t select any qualifications right now, because we’re just testing on the sandbox.(Plus, most qualifications have different ids on sandbox than production, so it wouldn’t work properly anyway.)
When you’re done, click “Create”. On the following screen, you should see a button that says “Register.” Click that to register your new HIT type with Mechanical Turk.
Create HITs
Click on “HITs” in the navigation pane, select the HIT type you just created in the “Create New HIT” form:
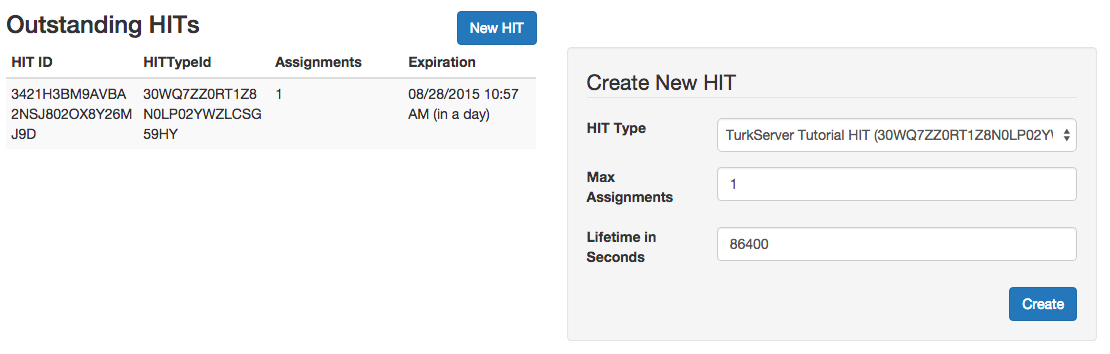
When you’re done, click “Create”.
View As Requester
Now go to the Amazon MTurk requester sandbox to check that your HIT was posted successfully. Click on “Manage” in the blue toolbar, and then click on “Manage HITs individually” in the top right. You should see your HIT:

View As Worker
To test this as a sandbox worker, go to the worker sandbox in a different browser or Chrome incognito tab. Find the HIT you just posted, click “View a HIT in this group”. If all went well, your app will be loaded into an iFrame at the default route
'/', which shows the “home” template and prompts you to accept the HIT: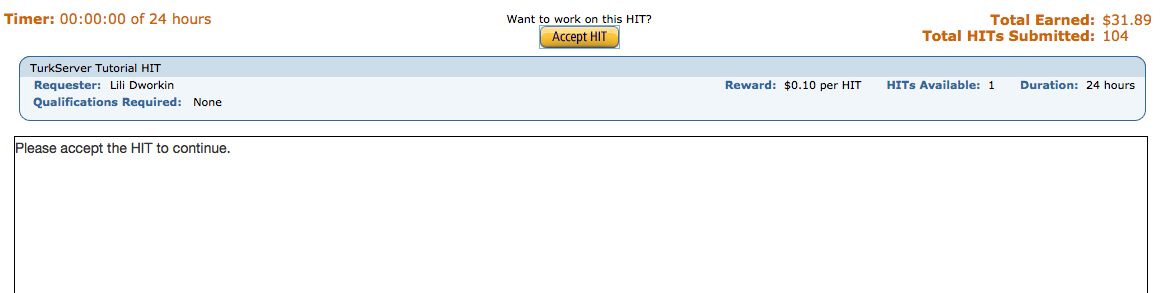
Click the “Accept HIT” button. You should now be put into an experiment, which shows the content under
'/experiment'route in your app.View As Admin
As the admin, the next thing you should do is check on the Mechanical Turk status of this assignment – is it “submitted” and/or “approved”?
Click the “Refresh Assignment States” button in the “Maintenance” well at the top of the page:
 The Status field of the assignment should now change from “Unknown” to “Submitted”:
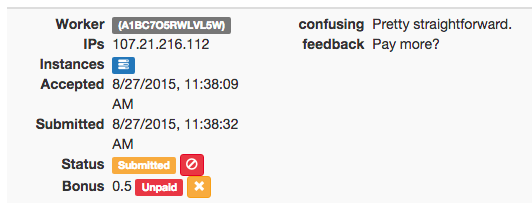
This means that Mechanical Turk knows that this assignment has been completed, but it has not yet been approved. We set the “Auto Approval Delay in Seconds” property of our HIT Type to a whole week, so we need to manually approve this assignment if we want it approved before then. Click the “Approve All Assignments” button in the “Maintenance” well to do this. You’ll see a popup that asks you to confirm – feel free to leave the message blank, and hit “Ok.” The Status field of the assignment should now change from “Submitted” to “Approved.”
Complete
Now that the assignment is approved, we can pay the worker’s bonus.
Click the “Pay All Bonuses” button in the “Maintenance” well. You’ll again see a popup that asks you to confirm – you do need to enter a message here, which will included in the email that Mechanical Turk sends to the worker to notify him of the bonus. When you click okay, you’ll see that the Bonus field of the assignment now has a “Paid” label next to it:
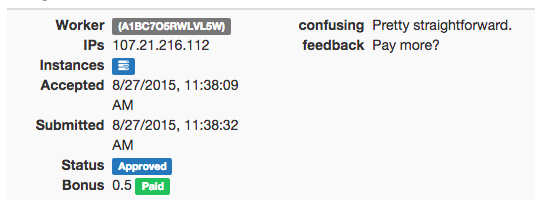
Assuming your worker sandbox account is tied to a real e-mail address, you should soon receive the corresponding notification e-mail.
Congratulations! – You have successfully posted a HIT, completed it, and paid yourself for doing so.
Ready to launch
Congratulations, you made it!
Now you can modify the demo, turn off sandbox in settings and launch your own experiments in the real world.
Enjoy your new research experience using TurkServer!