Basic Tutorial
This tutorial walks you through building a simple, but fully functional app that you can deploy and that demonstrates many of the features of TurkServer. If you’d prefer to start hacking from a working example, you can start poking around the code directly and follow the deployment instructions to get it online.
Much of this fantastic tutorial is due to the excellent work of Lili Dworkin.
Getting Started
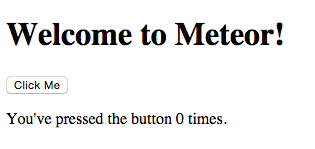
For the purposes of this tutorial, we will use the default Meteor “counter” app that comes bundled with every installation. To generate the necessary files, simply type meteor create app. To run the app, cd app and meteor. Then open a browser and navigate to http://localhost:3000/ to verify that all is working properly. You should see the following:
Before moving on, don’t forget to meteor remove insecure and meteor remove autopublish.
For easiest integration with TurkServer, you will need to add some basic routing to your app. This how you connect different urls (“routes”) to different templates. We will start with two routes:
- The default path
/, which will get shown when a worker is previewing your HIT. - A second path
/experiment, which will get shown after the worker accepts the HIT.
To do this, first add the Meteor package iron-router via meteor add iron:router. Then edit the block of HTML at the top of demo.html to look like this:
<template name="home">
    Please accept the HIT to continue.
</template>

<template name="experiment">
  <head>
    <title>demo</title>
  </head>

  <body>
  <h1>Welcome to Meteor!</h1>

  {% raw %}{{> hello}}{% endraw %}
  </body>
</template>
We have done two things here: we wrapped the existing HTML in a template called “experiment”, and we added another template called “home.” We want to show the “home” template when a worker is previewing the HIT, and the “experiment” template after they have accepted.
Next create a new file called routes.js and add the following to it:
Router.route('/', function() {
  this.render('home');
});

Router.route('/experiment', function() {
  this.render('experiment');
});
For a more detailed explanation of this code and a better understanding how routing works, see the iron-router docs. Essentially, we have told the app that when we navigate to the default route '/', we should see the “home” template, and when we navigate to the route '/experiment', we should see the “experiment” template.
Now we are ready to add the TurkServer package:
meteor add mizzao:turkserver
Next create a settings.json file, which needs to contain a password for the TurkServer admin interface (from which you will monitor your experiment) as well as your Amazon key and secret pair. (If you don’t have those, or don’t remember where to find them, go here). The file should look like this:
{
  "turkserver": {
    "adminPassword": "",
    "experiment": {
      "limit": {
        "batch": <int>
      }
    },
    "mturk": {
      "sandbox": <true|false>,
      "accessKeyId": "",
      "secretAccessKey": "",
      "externalUrl": "",
      "frameHeight": <int>
    }
  }
}
For now, fill in “adminPassword”, “accessKeyId”, and “secretAccessKey”. We’ll come back to the other parts later.
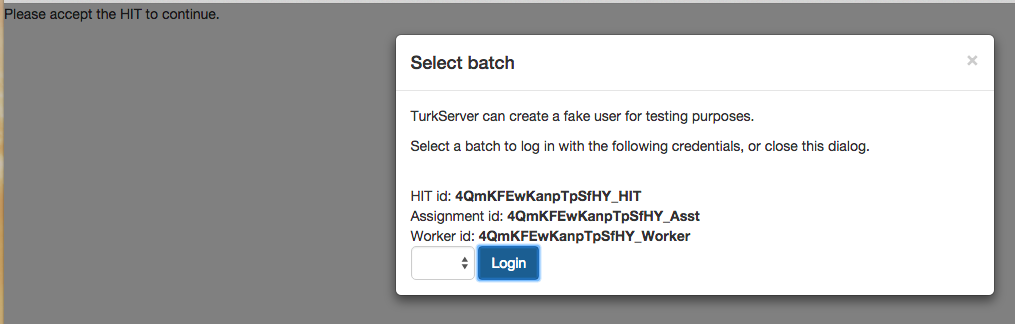
Finally, run your app with meteor --settings settings.json. When you navigate to http://localhost:3000/ (the default route '/'), you should see your “home” template (which prompts you to accept the HIT), and now you should also see a popup that prompts you to select a “batch:”
Don’t worry about this for now. Navigate instead to http://localhost:3000/turkserver and login with the password you put in your settings file. You should see the following admin interface:
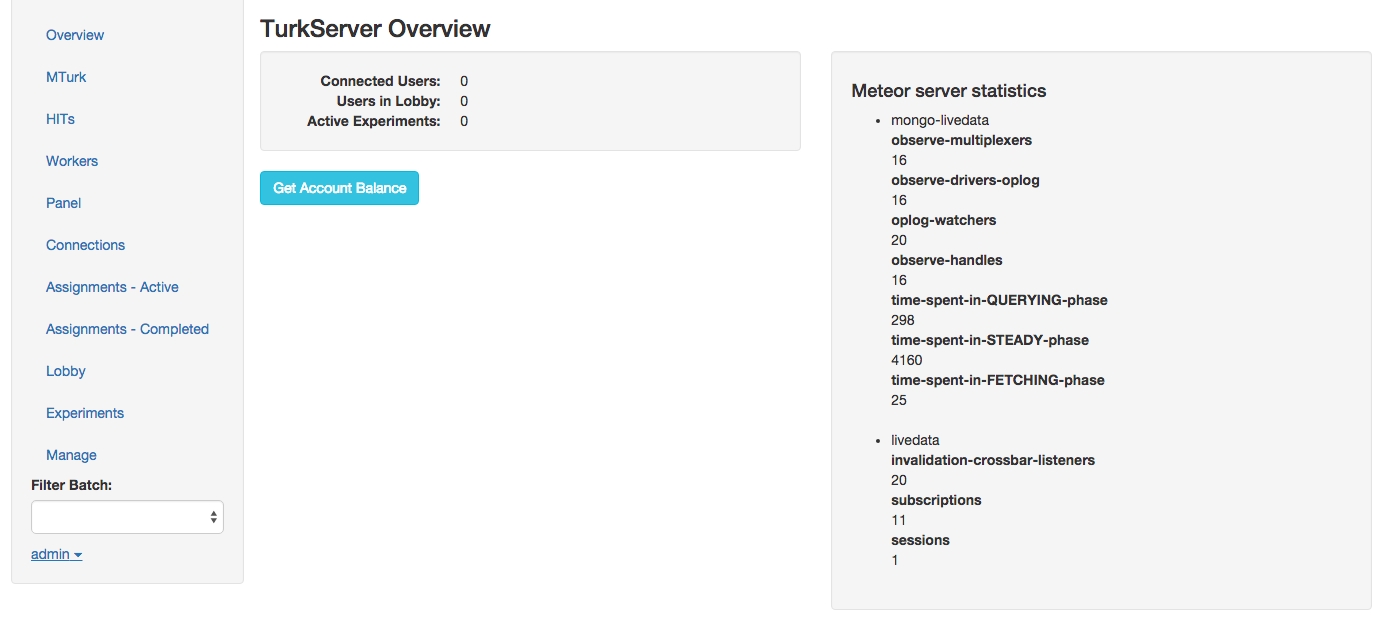
Feel free to explore a bit, but most of what you see won’t make sense just yet.
Building the App
As discussed earlier, TurkServer assumes that every HIT consists of a lobby, experiment(s), and exit survey. Typically a user will proceed through these stages in the following order: lobby -> experiment -> lobby -> exit survey. You specify the exact order you want by using an assigner. TurkServer comes with a few built-in assigners, but you can also write your own. We’ll briefly describe two of the built-in assigners: the “TestAssigner” and the “SimpleAssigner.”
First, note that matter what assigner you use, the following two rules are guaranteed:
- When a user accepts the HIT, he goes into the lobby.
- When a user finishes an experiment, he goes back to the lobby.
The TestAssigner enforces the following additional rules:
- When a user goes into the lobby for the first time (i.e. after he accepts the HIT), he immediately gets put into a joint experiment with all other users who have also accepted the HIT.
- When a user goes to the lobby for the second time (i.e. when he is done with the experiment), he immediately gets put into the exit survey.
The SimpleAssigner is similar, except that when a user goes into the lobby for the first time (i.e. after he accepts the HIT), he immediately gets put into his own experiment. So this assigner is appropriate for single-user HITs. We will be using the SimpleAssigner is the remainder of the tutorial.
To make this flow work properly, we need to glue each of the two possible states (experiment and exit survey) to a different template in our application. (Note: We don’t need to worry about making a template for the lobby, because the SimpleAssigner never lets the user stay there for long – he is always immediately redirected to the experiment or exit survey. If you write an assigner that makes users wait in the lobby, you will need to design a template for it.)
Let’s assume that when a user is in the experiment, we want him to see the “Click Me” page. And when the user is in the exit survey, we want him to see a submit button that will allow him to submit the HIT. We already have the “Click Me” page (in the “experiment” template), so let’s design the exit survey.
First, we’ll create the template. Add a block at the end of demo.html that looks like this:
<template name="survey">
  <button>Submit the HIT</button>
</template>
To add functionality to this button, add the following block to demo.js:
Template.survey.events({
  'click button': function () {
    TurkServer.submitExitSurvey({});
  }
});
We have now used the TurkServer API for the first time. The function
submitExitSurvey() will automatically submit a HIT to Mechanical
Turk. The function takes arbitrary JSON as an argument, so you can
pass in any data you want. The data will viewable in the TurkServer
admin console in real time. A natural thing to do is put a form in
your exit survey that asks the worker some follow-up questions about
the HIT. For example, modify your template as follows:
<template name="survey">
  <form class="survey">
    <p>Was there anything confusing about this HIT?</p>
    <textarea name="confusing" rows="3"></textarea><br/>
    <p>Do you have any feedback for us?</p>
    <textarea name="feedback" rows="3"></textarea><br/>
    <button type="submit">Submit the HIT</button>
  </form>
</template>
And modify the events code accordingly:
Template.survey.events({
  'submit .survey': function (e) {
    e.preventDefault();
    var results = {confusing: e.target.confusing.value,
                   feedback: e.target.feedback.value}
    TurkServer.submitExitSurvey(results);
  }
});
Note that we changed the event from a button click to a form submission, so we need to use e.preventDefault() to prevent the browser from automatically handling the event.
Add the following block to routes.js:
Router.route('/survey', function() {
  this.render('survey');
});
Finally, we need to tell our app that when a user is in the experiment state, we should load the '/experiment' route (which is connected to the “experiment” template), and when a user is in the exit survey state, we should load the '/survey' route (which is connected to the “survey” template). Add the following inside the Meteor.isClient block at the top of demo.js:
Tracker.autorun(function() {
  if (TurkServer.inExperiment()) {
    Router.go('/experiment');
  } else if (TurkServer.inExitSurvey()) {
    Router.go('/survey');
  }
});
There are a few things worth noting about this code. We have made use of two boolean reactive variables provided by TurkServer: TurkServer.inExperiment() and TurkServer.inExitSurvey() (unsurprisingly, there is also TurkServer.inLobby()). When the state of the user changes, the value of these variables will update accordingly. The Tracker.autorun block will re-run whenever the variables change, which means that whenever the state of a user changes, our app will load the appropriate route, and therefore show the appropriate template.
Tracker.autorunis the standard reactive programming approach in Meteor. If you are confused about this, take a minute and read this.
There is still one missing piece. We know that when a user accepts the HIT, he goes to the lobby, and then the SimpleAssigner puts him into an experiment. And we know that when the experiment ends, he’ll go back to the lobby, and the SimpleAssigner will put him into the exit survey, where he’ll be able to submit the HIT. But how do we let the user end his experiment? Let’s add a button on the “Click Me” page that will allow the user to move to the exit survey when ready. Edit the “hello” template in demo.html to look like this:
<template name="hello">
  <button id="clickMe">Click Me</button>
  <p>You've pressed the button {{counter}} times.</p>

  <button id="exitSurvey">I'm Done</button>
</template>
Note that we added an id attribute to both buttons so that we can distinguish between them in the events code. Now edit the Template.hello.events block in demo.js as follows:
Template.hello.events({
  'click button#clickMe': function () {
    // increment the counter when button is clicked
    Session.set('counter', Session.get('counter') + 1);
  },
  'click button#exitSurvey': function () {
     // go to the exit survey
     Meteor.call('goToExitSurvey');
  }
});
And define the new method goToExitSurvey() within the Meteor.isServer block (but outside of the Meteor.startup() block) at the bottom of demo.js:
Meteor.methods({
  goToExitSurvey: function() {
    var exp = TurkServer.Instance.currentInstance();
    exp.teardown();
  }
});
In our new method goToExitSurvey(), we first grab the JavaScript object corresponding to the user’s current experiment. (TurkServer uses the terms “instance” and “experiment” interchangeably; I will try to stick to “experiment.) Then we call the teardown() method of this object, which ends the experiment. So this point the user goes back to the lobby, and then the SimpleAssigner sends him to the exit survey, so he can submit the HIT.
We’ve talked a lot about the SimpleAssigner, but we haven’t actually yet told our app that we want to use it. To do so, we need to create a batch for our HIT, and then add the SimpleAssigner to this batch. Recall that a batch is a way of defining TurkServer-specific properties of our HIT, and the assigner type is one of these properties.
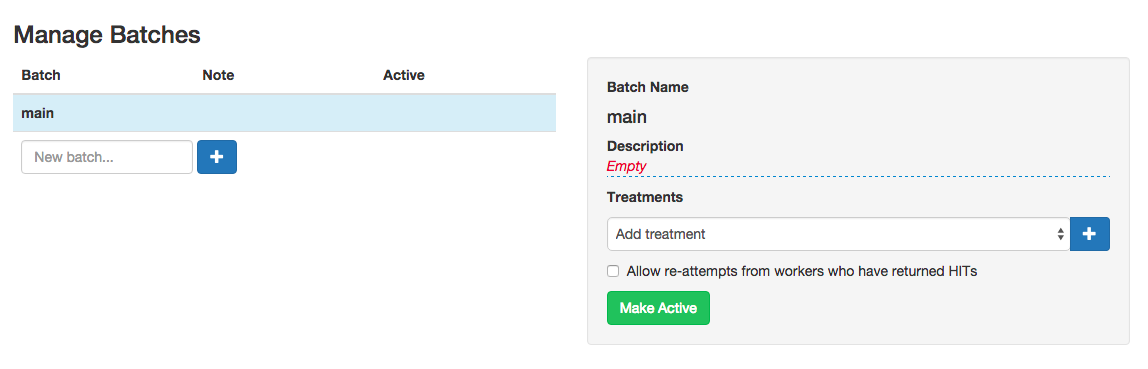
We can create a batch via the admin interface. Go back to http://localhost:3000/turkserver. Click on “Manage” at the bottom of the left sidebar. Under the “Manage Batches” header, type the name “main” into the textbox, and then hit the blue “+” button. You should see a row appear above that says “main.” Click on it. In the box that shows up on the right, click the green “Make Active” button.
To add the SimpleAssigner to your new “main” batch, add the following code within the Meteor.startup block of the Meteor.isServer block at the bottom of demo.js:
var batch = TurkServer.Batch.getBatchByName("main");
batch.setAssigner(new TurkServer.Assigners.SimpleAssigner);
A few more TurkServer API calls here. First we grab the JavaScript object corresponding to the batch that we created. Then we call its method setAssigner() to tell our app that all HITs in this batch should use the SimpleAssigner.
Running as a Fake User
Now that we have a batch and an assigner, our HIT flow will work
properly, so we can finally test it all out. TurkServer allows you to
login as a fake Mechanical Turk user, which is very useful for testing
without having to create HITs on your MTurk sandbox account. Navigate
to http://localhost:3000/ and you’ll see the popup from
before. TurkServer is asking us which batch we want to test out. We
only have one (“main”), which should be selected by default.
The popup also provides some other information: TurkServer has generated a fake HIT id, assignment id, and worker id for us. What’s happening is that TurkServer is “pretending” that:
- We have created a HIT belonging to the batch “main” and posted it on Mechanical Turk.
- A worker (you) has accepted this HIT, and therefore a new assignment has been created.
Click “Login” to set this whole process in motion.
After “accepting” the HIT, you go straight into the lobby. The code sees that you are in batch “main”, and that the assigner on this batch is a SimpleAssigner. The SimpleAssigner ensures that when you enter the lobby for the first time, you go straight into the experiment stage. So TurkServer.inExperiment() becomes true and the Tracker.autorun block in demo.js calls Router.go('/experiment'). The routing code in routes.js then loads the “experiment” template, so you see the “Click Me” page.
When you are ready to move to the exit survey, click “Exit Survey.”
Now the client calls the goToExitSurvey() method, which ends the
experiment, so you go back to the lobby. The SimpleAssigner ensures
that when you enter the lobby for the second time, you go straight to
the exit survey stage. So TurkServer.inExitSurvey() becomes true,
which results in our router loading up the '/survey' route, and the
“survey” template is displayed.
Fill in the survey questions, and then click the submit button. You might see an error, but that’s just because we aren’t hooked up to Mechanical Turk. Later we’ll run this app on the sandbox, and this part will work just fine.
The Admin Console
Now let’s use the admin console to dig a bit deeper into what just happened. Go to http://localhost:3000/turkserver and login. Select you “main” batch in the “Filter batch:” dropdown at the bottom of the left navigation pane. You should get in the habit of doing this, as most of the admin console functionality won’t work unless a batch is selected.
Now click on “Assignments - Completed” in the left navigation pane. You should see something like the below:
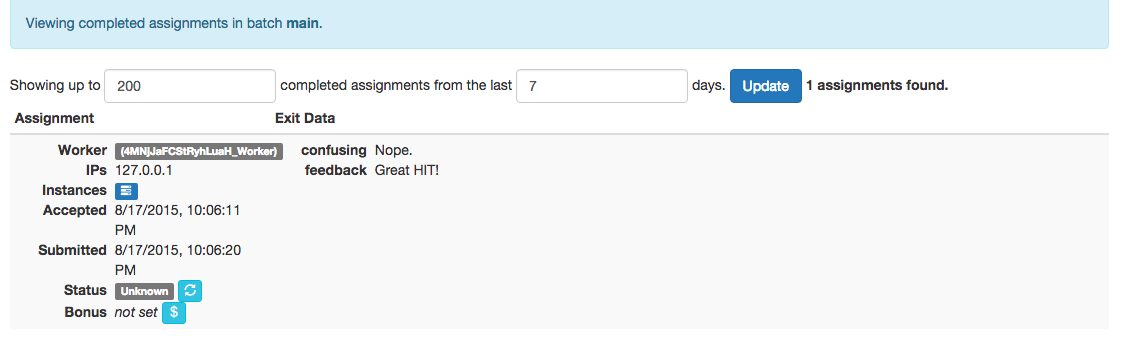
This shows the results of the HIT you just completed as a fake user. More precisely, it shows the details of your assignment. Recall the following facts about users, assignments, and experiments:
- A user can accept many different HITs over his lifetime and therefore have many different assignments, but he can only be in one assignment at a time.
- An assignment contains all the experiments that a user did during the HIT. (In our case, each user only does one experiment per HIT, so each assignment will only have one experiment associated with it.)
- An experiment can contain multiple different users. (In our case, each experiment only has one user.)
Take a look at some of the data recorded for this assignment:
- You can see your fake Mechanical Turk WorkerId at the top – hover over it to see some more data about your fake user (for instance, he is in a “disconnected” state because he already submitted the HIT).
- You can also see the times you accepted and submitted the HIT.
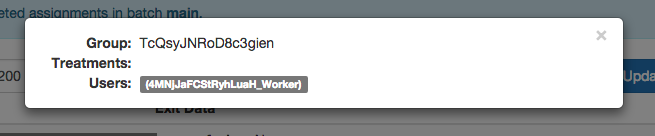
- The Instances field shows one square blue icon, which corresponds to the one experiment you did in this assignment. If you click on that icon, you will see a popup with the id of that experiment, as well as a list of the users who participated:
- There is also a Bonus field, which reads as “not set.” In addition to paying a user the promised base rate for a HIT, you may want to bonus the user according to the work he did. TurkServer makes it very easy to increment a user’s bonus while he completes the experiment, and then pay him later. We’ll come back to this shortly.
- The answers you submitted during the exit survey are recorded in the right column.
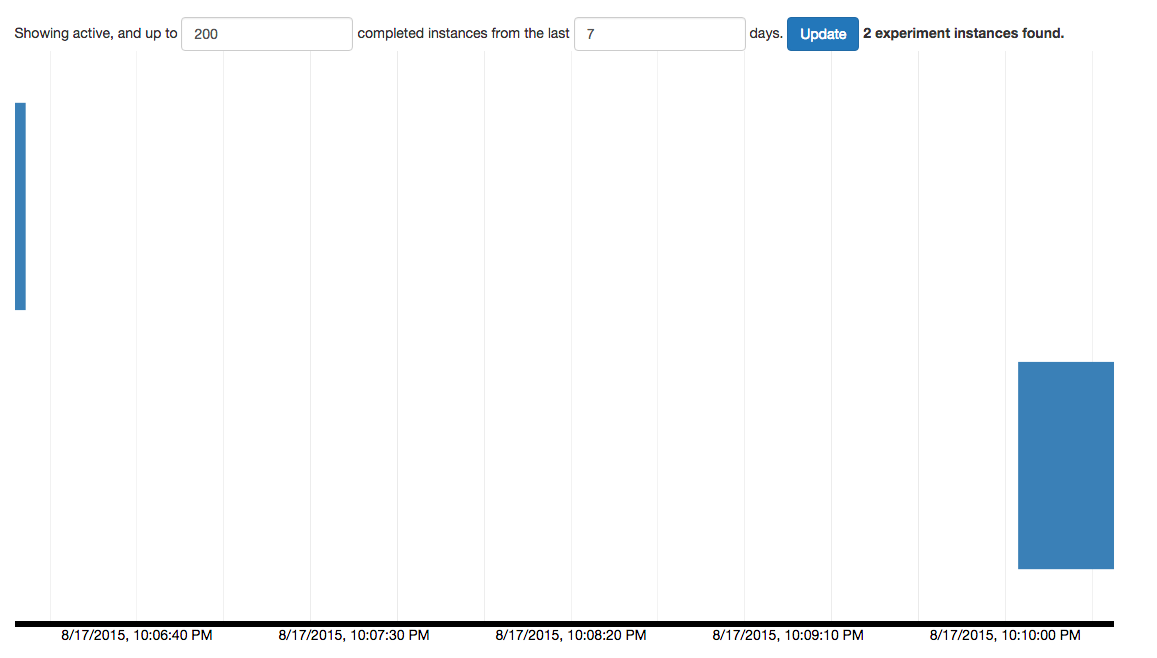
Now click on “Experiments” in the left navigation pane. You should see something like the below:
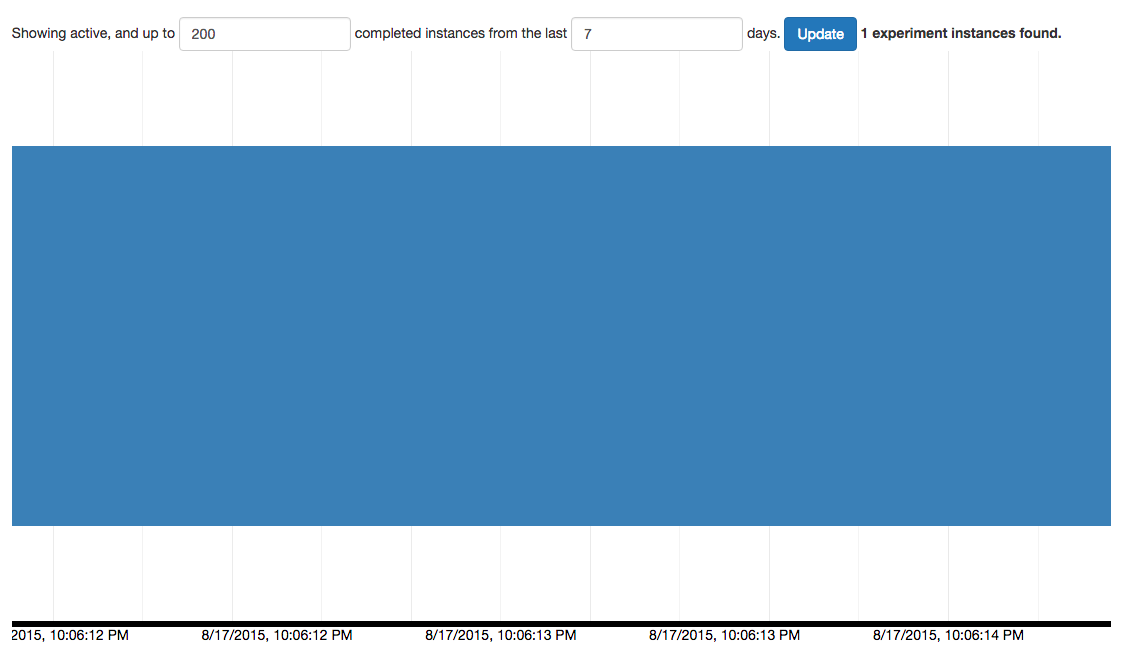
This is a visualization of completed and ongoing experiments. There will be bar per experiment. Since we have only done one experiment, we just see one fat bar. The x-axis is the time spent in this experiment. Click on the bar, and you will see the same pop-up that you saw when you clicked on the little blue square on the previous page.
Scroll down a bit, and you’ll see something like:
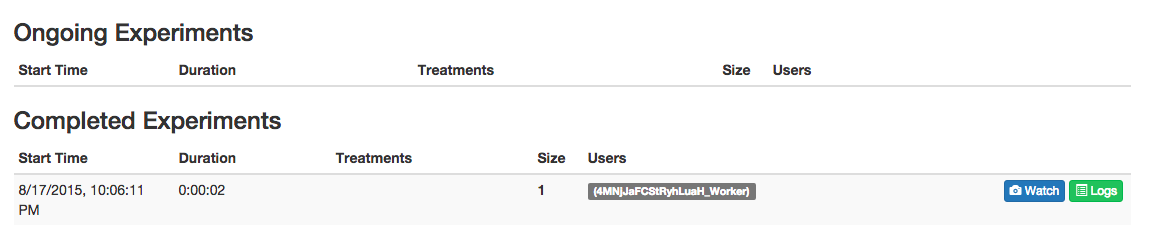
There are no ongoing experiments, but there is one completed experiment. Here we see the start time, duration, and size and user identities. Don’t worry about the “treatment” field or the “watch” or “logs” buttons for now.
Now we’re going to do another experiment (as another fake user) and this time we’ll follow along in the admin console. You will need two browsers for this (or two tabs with one of them in incognito/private mode), because you will be logging in simultaneously as two users: the “admin” user and a fake Mechanical Turk User. In one browser, navigate to http://localhost:3000/turkserver, and in the other to http://localhost:3000/. Login to both. In one browser, you should see the admin console, and in the other, you should see the “Click Me” page.
Go back to the admin console and click on the Experiments tab. You should now see two bars in the visualization, and the second one should be “growing” with time, because this second experiment is still going on:
Scroll down, and you’ll see that there is one ongoing experiment. The worker ID is highlighted in green, which means that he is currently online. (A grey background means he is disconnected.)
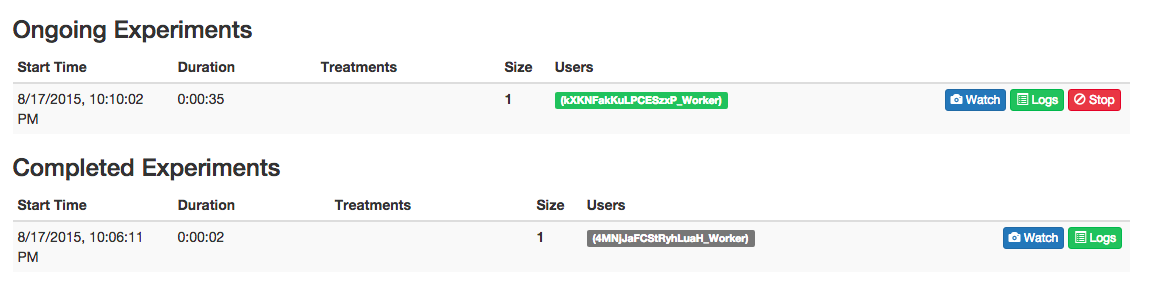
Now click on “Assignments - Active” in the left navigation pane. You should see something like the below:

Pretty self-explanatory. Note that assignments are typically in one of two states: “assigned” or “completed”. When a user submits a HIT, the assignment becomes completed and moves from the “Assignments - Active” to the “Assignments - Completed” page in the admin console.
Next click on “Connections” in the left navigation pane. You should see something like:

Here is where you can keep tabs on all currently connected users. A user’s state will either be lobby, experiment, or exit survey.
Finally, go back to the other browser window, and submit this HIT. Then in the admin console, verify that all the data has changed accordingly. There should be two completed experiments, two completed assignments, no active assignments, and no connections.
Partitioned Collections
So this experiment was pretty uninteresting; we didn’t even record any data. Let’s save the number of times that a user clicks the button, and also update his bonus accordingly. The more times he clicks the button, the more money he will make. (I’ll choose to ignore the ridiculousness of this idea.)
Let’s create a new Mongo collection for this purpose. Create a new file models.js and add the following:
Clicks = new Mongo.Collection('clicks');
TurkServer.partitionCollection(Clicks);
You should be familiar with the first line of code. The second is a bit more mysterious, but bear with me for now.
Now go to demo.js, and within the Meteor.isClient block, add the following:
Tracker.autorun(function() {
  var group = TurkServer.group();
  if (group == null) return;
  Meteor.subscribe('clicks', group);
});
Next, within Meteor.isServer block, add:
Meteor.publish('clicks', function() {
  return Clicks.find();
});
It’s not crucial to understand all of what’s happening here, but the general idea is important. A key concept to Turkserver’s functionality is the idea of “partitioned” Mongo collections. A partitioned collection has the property that every document belongs to exactly one experiment. When a user is in an experiment, he can only see documents in the collection that belong to that experiment.
To be more specific, normally we know that Collection.find() will return all documents in the collection. But if this collection has been partitioned and the user is in an experiment, then Collection.find() (regardless of whether it is called on the client or server) will only return the documents in the collection that also belong to the experiment.
The partitioning of collections is a key abstraction that allows experiments in TurkServer to be designed at the instance level. This in turn allows for many different types of experiment designs, while differing very little from Meteor’s standard publish-subscribe model. In many cases, multi-person interactions are as simple to design as single-person interactions.
Advanced users might mix partitioned and non-partitioned collections in Meteor code. Partitioned collections will show different data to participants in each experiment instance, while non-partitioned collections must be separately controlled by your code.
See the docs for partitioner for more details on how this works.
Now we can make more sense of the code. The line TurkServer.partitionCollection(Clicks) sets Clicks to be a partitioned collection. So every document will belong to one and exactly one experiment.
Next, look at the subscription code. First note the variable TurkServer.group(), which is a reactive variable that returns the id of the experiment that a user is currently in. Because this code is in a Tracker.autorun block, every time the value of this variable changes (i.e. whenever the user enters or exits an experiment), the block will re-run. If the value is not null, then the user is indeed in an experiment, so we re-subscribe to the Clicks collection.
A re-subscription triggers the publication code on the server. The
Meteor.publish code we added looks standard, but because the user is
currently in an experiment, the Clicks.find() part will only return
documents that also belong to this experiment. This way, a user only
subscribes to the documents that are relevant to his experiment,
automatically dividing real-time data between groups. (If this was
confusing and you need a refresher on Meteor’s publish/subscribe
protocol, take a look at the
docs.)
Now we are finally ready to use our new partitioned collection. Instead of storing the number of clicks on Meteor’s Session object, we’ll store it on our new Clicks collection. To make this work, we’ll need to add a new document to this collection whenever a user enters an experiment, and initialize the “count” field of this document to 0. TurkServer makes it easy to take certain actions upon the start of an experiment – use the TurkServer.initialize function, which takes as input another function that will be run upon every experiment initialization. Add the following within the Meteor.isServer block:
TurkServer.initialize(function() {
  var clickObj = {count: 0};
  Clicks.insert(clickObj);
});
We don’t need to add any other fields to the Click document besides
count. This is because Clicks is partitioned, so whenever we add a
document, it automatically gets “tied” to the current experiment. More
precisely, behind the scenes, a hidden field called _groupId is
added. The value of this field is the id of the current experiment
(i.e. the id of the Mongo document that corresponds to the current
experiment – more on this shortly). So later when we analyze our
data, we can search for a Click document with _groupId: <our experiment Id>, and we’ll find the right document and be able to tell
how many times we clicked the button. We’ll go through that exercise
later and it will be clearer then.
Now go to demo.js and edit the Template.hello.helpers and Template.hello.events blocks as follows:
Template.hello.helpers({
  counter: function () {
    // get our Click document
    var clickObj = Clicks.findOne();
    // if it exists, return the count field
    return clickObj && clickObj.count;
  }
});

Template.hello.events({
  'click button#clickMe': function () {
    // update our Clicks document
    Meteor.call('incClicks');
  }
});
Note the use of Clicks.findOne() – because Clicks is partitioned, even if other users have inserted their own Click documents in other experiments, we only have access to our own click document, so we can treat the Clicks collection as if it only contains one document.
Finally, define the incClicks method in your server-side Meteor.methods block:
Meteor.methods({
  incClicks: function() {
    Clicks.update({}, {$inc: {count: 1}});
  },
});
Again, because Clicks is partitioned, we don’t have to specify which document to update – the code automatically knows to update the document corresponding to our experiment.
Now to test that this all worked properly, load up http://localhost:3000/ again, login as a fake user, and go through the HIT. Click the button a few times and check that the number goes up appropriately. Then submit the HIT.
To double-check that the Clicks document was inserted and updated correctly, we can use Meteor’s Mongo console. Type meteor mongo at the command line, and then db.clicks.find(). You should see something like:
{ "_id" : "pZJRGTTgktiAooW8y", "count" : 6, "_groupId" : "JrYnXMhbqdspadttQ" }
As promised, a secret field called _groupId was added to the document. The value of this field is the id of the experiment to which the document belongs.
Now say we had a ton of users who all completed the experiment, and we just wanted to find the click count of a particular experiment. Typing db.clicks.find() will call up every single document, which will be unhelpful. But if we know the id of the experiment we want, we can search for the corresponding Click document. We can find experiment ids in a few places in the admin console:
- From the Experiments page: Click on any of the blue bars. When the pop-up appears, look at the value of the Group field. That’s the id of the experiment you clicked on.
- From the Assignments - Completed page: Click the blue box next to Instances to select the experiment that was completed in that assignment. The same kind of pop-up will appear.
Let’s grab the id of the most recent experiment. So either click on the right-most bar on the Experiments page, or the top-most blue square on the Assignments - Completed page, and then copy the value of the Group field on the pop-up that appears. Now go back to the mongo console and type db.clicks.find({_groupId: '<value you copied]}). You should see the same Click document you saw earlier.
Setting Payment
So this is well and good, but we still haven’t dealt with bonusing the user according to how many times he clicked the button. Let’s edit our incClicks method so that whenever we increment the counter, we also add some money to the user’s bonus:
incClicks: function() {
  Clicks.update({}, {$inc: {count: 1}});
  var asst = TurkServer.Assignment.currentAssignment();
  asst.addPayment(0.1);
},
First this code grabs the JavaScript object corresponding to the user’s current assignment. Recall that we have an assignment object for every <user, HIT> pair, so this is the natural place to store a bonus. Then we call the method addPayment() to increment the bonus by a fixed amount (in this case, 10 cents).
You should start seeing a pattern emerging with these TurkServer API calls. First we grab a particular JavaScript object – e.g. a batch, an experiment, or an assignment. Then we call one of its methods. If you’re curious about what methods are available on these objects, see the relevant files in turkserver-meteor/lib, namely batches.coffee, instance.jsx, and assignment.jsx.
To see if this worked properly, go through the HIT yet again. Be sure to click the button a few times. Then go to the admin console and the Assignments - Completed page. On the most recent assignment, you should see a value next to the Bonus field, as well as a red label that says “Unpaid.”

So we’ve set the bonus value, but we haven’t yet approved the worker’s assignment or paid the bonus. We can’t test out this functionality while running as a fake user, so we’ll have to move to Mechanical Turk’s sandbox environment.
Deployment
To continue with the tutorial, follow the deployment instructions so that you can use the actual MTurk API and get the app running in the MTurk sandbox.
HITs and HITTypes
The next step is to create a new HIT type. We can do this in the admin console. Click on “MTurk” in the admin console navigation pane and go through the process of filling out the form on the right side. First we have to choose a batch for the HIT type. All HITs with this HIT type will belong to the batch we choose. This important because the only way TurkServer knows which assigner to use on a particular HIT is by checking which batch the HIT belongs to. If TurkServer doesn’t know what assigner to use, then the app won’t know where to send a user after he enters the lobby, and the user will end up in a limbo state.
Choose the “main” batch, and then fill out all other fields. Most are self-explanatory, but complete descriptions can be found in the Mechanical Turk API docs here. You can leave the “Assignment Duration in Seconds” and “Auto Approval Delay in Seconds” fields set to their default values, which ensure that we have one day to complete our HIT once we accept it, and that our assignment will be automatically approved in a week.

The only non-trivial part of this process has to do with worker qualifications. TurkServer makes it easy to add a few commonly-used qualifications, such as: “US Worker” or “95% approval rate.” Simply select the ones you want in the box by holding down the control key (Windows) or command key (Mac) and clicking the names.
If you want to add your own qualification type, use the form at the bottom of the page. For instance, say we wanted to ensure that only workers with a Masters qualification can accept our HIT. Go to the Mechanical Turk API docs page here to look up the corresponding qualification type ID. Note that the docs say to “set the comparator parameter to ‘exists’ to require that workers have this qualification.” Thus, fill out the form as follows:
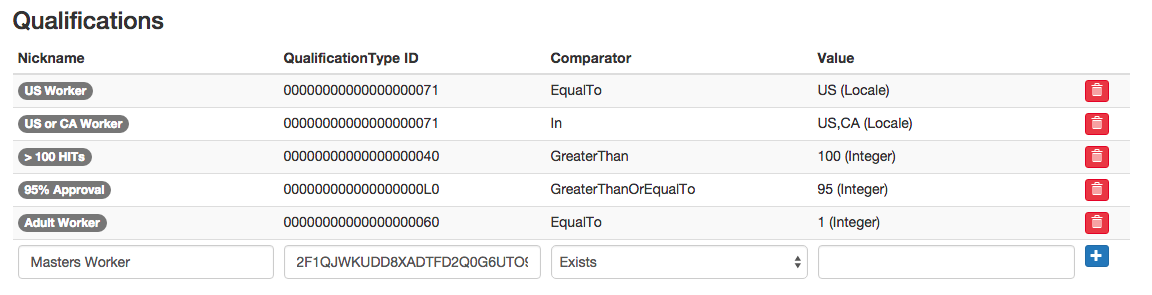
and then hit the blue “+” button. You now should see your new qualification in the dropdown menu in the form above:

Don’t select any qualifications right now, because we’re just testing on the sandbox (plus, most qualifications have different ids on sandbox than production, so it wouldn’t work properly anyway.)
When you’re ready, click “Create”. On the following screen, you should see a button that says “Register.” Click that to register your new HIT type with Mechanical Turk.
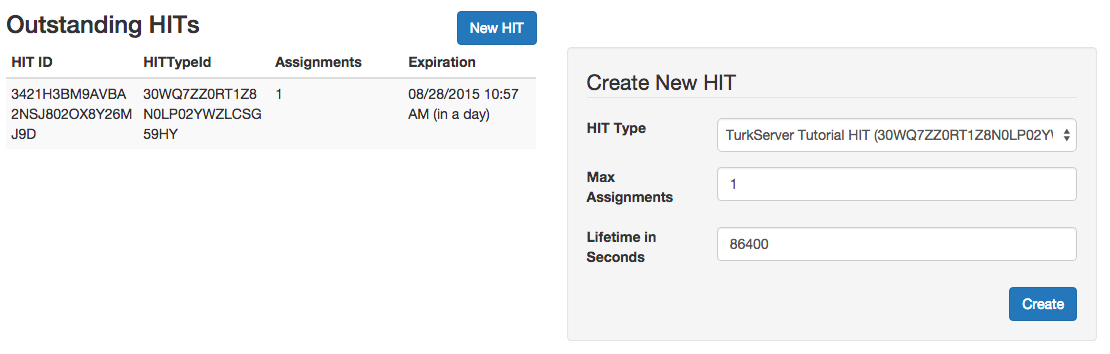
At this point we’re all set to create our HIT. Click on “HITs” in the navigation pane. In the “Create New HIT” form, select the HIT type we just created from the dropdown menu. Leave “Max Assignments” and “Lifetime in Seconds” at their default values, which ensure that only one worker can accept this HIT, and that the HIT will be available for one day until it expires. When you’re done, click “Create.” You should see the HIT pop up in the table to the left:
Using the Mechanical Turk Sandbox
The MTurk Sandbox allows you to test and debug your app without spending real money. See the deployment instructions for how to post a HIT and pay your workers.